This past summer, I had the privilage of Hosting (along with my mom) my sister's bridal shower. I have to say, this was the very first time I was decorating a cake with fondant and gumpaste.
Long story short, I took a Wilton class to learn how to work with fondant and gumpaste. I really thought I could do what Cake Decorators do, since I have been baking cakes and frosting them. How hard could fondant be?
I also bought the Cricut Cake. I saw some Demos of it and I thought to myself, this could come in handy!
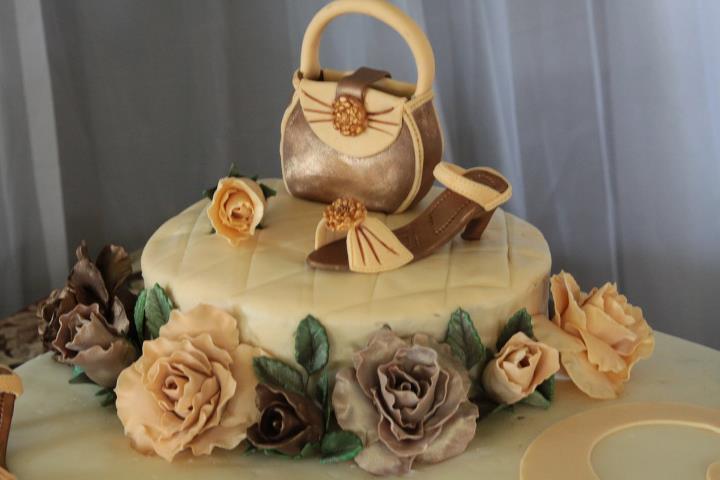
And so, here it is, my very first cake, covered in fondant!
I made the flowers out of 50/50 mix. I cut out the flat rose flower from the Cricut Cake and molded them to make them 3D. The Purse was also cut from the Cricut Cake, although the embelishments were silicone 3D molds. The shoe was a cutter from Gem Cutters. But I embelished it with the silicone molds. The Monogram S is also cut from Elegant Cakes on the Cricut Cake.

Side view
Close Up.
Not content with making the cake, I also wanted to make some Cookie Pops for Favors. I put the chocolate chip cookie dough in balls on the premade cookie pop pans. These are made by WILTON and they have all sorts of diffrent figures. I bought the generic circle because I figured I could make more use of them. You can always add a fondant cookie cover on them.

Next, you insert the sticks on the cookie dough. Notice how there is an indentation where the stick goes? This works out perfectly.

This is what they should look like after baking, let them cool down a bit and then...

pop them off the pan and into the cooling rack.

In the mean time, I cut the letter S on my Cricut Cake. This is pure fondant since it will be placed ontop of the cookie to be eaten. Make sure to freeze the fondant for at least 30 minutes before cutting. Then after you cut it, freeze it again for 15 minutes. Remove the surounding fondant and carefully transfer over to a drying area.

I let them dry overnight so they could be a little stiff and keep their shape when I placed them ontop of the cookie.
For the cookie, I filled the center with cookie Icing and used a spoon to make sure it was round.

I then placed the letter ontop and let it dry overnight.

And this was the final cookie. They were wrapped in plastic bags and tied with a pretty string with a tag.
Thanks for looking!
ALI
If this is your first cake then you missed your calling, lol! It's Gorgeous! Love, Love, Love those flowers, they look so Real! You really made the day truly a Special one!
ReplyDelete((Hugs)) Theresa
OH, MY GOODNESS!! The cake is gorgeous! Excellent work!
ReplyDeleteCarolyn
http://cccscraproom.blogspot.com
Beautiful job! I'm in awe . . .
ReplyDeleteYou did terrific!! Absolutely fantastic!
ReplyDelete